TRS-80 Basic IDE
The Basic IDE is a simple Windows application written in C# that makes your life easier when writing BASIC code for very old machines, especially the ones that require line numbers.
It's geared towards the TRS-80 Model 100 but theoretically works with any computer that allows file transfer via serial port.
BASIC language enhancements
This chapter explains various enhancements that the IDE provides
Debug/Release mode
The IDE can build your project in debug and release mode. Debug mode uses 10 as starting line and increments in steps of 10. No special compilation steps or optimizations are performed.
Release mode uses 1 as starting point and increments in steps of 1. It also strips comments and debug instructions from your program.
Unless otherwise specified, this documentation uses debug mode for code examples
Automatic line numbers
You no longer need to write line numbers yourself. Example:
INPUT "Enter your name";S$
PRINT "Hello, "+S$
Gets turned into
10 INPUT "Enter your name";S$
20 PRINT "Hello, "+S$
Labels
Without line numbers, commands such as GOTO could not be implemented.
The Basic IDE introduces labels to serve as replacements for line numbers.
Labels take the form of @name.
No whitespace is permitted between "@" and the "name" part.
The name must consist of alphanumeric characters only.
Declaration
A label declaration is made by having it as the sole instruction of a line. BASIC will later reference the computed line number of the label. You can declare a label only once, and it cannot be a function name. Functions automatically declare a label with the function name.
Reference
Labels can be referenced anywhere in the code and as often as you want.
The compiler passes twice over the source code. The first time it replaces declarations with line numbers, the second time it replaces references. This allows you to reference a label that is declared later in the source.
Labels inside of strings are not replaced.
Label example
@start
INPUT "Enter your name";S$
PRINT "Hello, "+S$

@ask
PRINT "Try again [Y/N]?"
S$=INPUT$(1)
IF S$="y" OR S$="Y" THEN GOTO @start
IF S$="n" OR S$="N" THEN GOTO @end
GOTO @ask

@end
PRINT "Good bye"
Gets turned into
10 INPUT "Enter your name";S$
20 PRINT "Hello, "+S$

30 PRINT "Try again [Y/N]?"
40 S$=INPUT$(1)
50 IF S$="y" OR S$="Y" THEN GOTO 10
60 IF S$="n" OR S$="N" THEN GOTO 80
70 GOTO 30

80 PRINT "Good bye"- start is replaced with 10
- ask is replaced with 30
- end is replaced with 80
PRINT @
TRS-80 BASIC has a "PRINT @" instruction
that is used to print at a given location on the screen.
This can confuse the label detection system.
You can solve this by changing the whitespace.
Instead of PRINT @5,"Test" write PRINT@ 5,"Test" to avoid @5 being detected as a label.
Comment removal
In release mode, lines consisting of a comment are removed. This means you can freely add very detailed comments to your program and don't have to worry about them blowing up the file size or slowing down the program. It will only remove instructions that are entirely a comment.
Example:
REM TEST : PRINT 1 : REM 2 : PRINT 3 '4 : PRINT 5 : '6Gets turned into
1 PRINT 1 : PRINT 3 '4 : PRINT 5Debug statements
You can prefix an instruction with # to mark it as a debug statement.
Like with comments, debug statements are removed in release mode.
This allows you to put "STOP" and "PRINT" statements into your code
without having to remove them when you publish your program.
The debug symbol is not white space sensitive. #PRINT is the same as # PRINT
The debug symbol is only valid as the first non-whitespace in an instruction.
Example:
# PRINT 1 : PRINT 2 : #PRINT 3Gets turned into
10 PRINT 1 : PRINT 2 : PRINT 3but in release mode becomes
1 PRINT 2Functions
This is likely the biggest addition to BASIC. This IDE allows you to create functions and "almost" use them like any other function.
Function names must follow the same rule as labels.
Functions in the IDE are added using the project menu, or the context menu on the project tree.
Unless the last line of a function contains an unconditional return instruction,
one will be added silently at the end of the function.
This means you do not need to end every function with a lone RETURN
Declaring arguments
Function arguments are declared by the new "ARG" statement. The declaration can be anywhere inside of a function, but it's generally recommended to keep them on top of the function. Declaring arguments for an integer, string, and double in this order works like this:
ARG A%
ARG B$
ARG C#
When you save the code, the tree view will update with the arguments. Argument names can be freely chosen as long as they are valid variable names. Declaring the argument type is mandatory.
Please be reminded that this type of BASIC lacks a function scope. Arguments will silently overwrite whatever value they may have had before the function call, and the value is not cleared after the function call.
Note: ARG lines must be their own line.
You currently cannot combine them using : or specify multiple arguments at once.
Main function
The main function is the function that gets executed first. It's always the first function listed in the function list and created when you create a new project. You can rename it if you want to.
BASIC IDE will automatically add an invisible END at the end of the function.
Apart from that, it behaves like other functions and can be called too.
While you can declare arguments for the main function, it's always called without arguments when the program starts.
Calling a function
A function can be called using GOSUB @name,
or CALL @name, the latter being the preferred way because it unlocks additional features.
Note that the Basic IDE is smart enough to figure out if you're using a funtion call, or try to call machine level language.
Function calls must be their own instruction. Valid:
I%=CALL @somefunc : PRINT I%Invalid:
PRINT CALL @somefuncNote that the first example (while valid) will not actually print anything. CALL is implemented using GOSUB, and instructions that follow a GOSUB on the same line are skipped. The IDE will generate a warning if you try to do this.
Function arguments
You can pass arguments into a function using a function call. Arguments can consist of any BASIC expression that can be assigned to a variable. Including but not limited to:
- Variables:
A$, B% - Functions:
RND(1), STR$(X%), SIN(0.5) - Constants:
3.141, "Test", 9 - Operations:
I%*20+RND(1)
You cannot pass another custom function call.
Invalid: CALL @F1(CALL @F2)
Instead you need to do this:
I%=CALL @F2
CALL @F1(I%)
Example of passing arguments:
I%=20
CALL @demo("Test",2,STR$(5),RND(1),I%*5)
END

@demo
ARG TEXT1$
ARG NUM1%
ARG TEXT2$
ARG NUM2#
ARG NUM3%
PRINT TEXT1$ + " " + TEXT2$
PRINT NUM1% * NUM2# + NUM3%
gets turned into
10 TEXT1$="Test" : NUM1%=1 : TEXT2$=STR$(5) : NUM2#=RND(1) : NUM3%=I%*5 : GOSUB 30
20 END
30 PRINT TEXT1$ + " " + TEXT2$
40 PRINT NUM1% * NUM2# + NUM3%
50 RETURN
CAUTION! Note how line number 10 gets long very quickly. BASIC has a line length limit of 255 characters. If you think you're going to exceed the limit, assign complex expressions to variables on their own line, then pass the variable in the call.
Returning values
You can return values from a function:
NUM%=CALL @ask_1to9
PRINT NUM%
END

@ask_1to9
INPUT "Enter a number";I%
IF I%<1 OR I%>9 THEN PRINT "Invalid number" : GOTO @ask_1to9
RETURN I%
gets turned into
10 ZZ#=0 : CALL 50
20 NUM%=ZZ#
30 PRINT NUM%
40 END

50 INPUT "Enter a number in the range 1-9";I%
60 IF I%<1 OR I%>9 THEN PRINT "Invalid number" : GOTO 50
70 ZZ#=I% : RETURN
BASIC needs to know what type of value you return.
If you return a variable with a suffix, for example RETURN I%,
it can infer the type from it.
If this is not possible, for example because you RETURN RND(1),
it defaults to a double precision number as if the # suffix was supplied,
and it will show a warning.
Note that the compiler is not aware of any DEF*** statements you may have put into.
You can override the default by supplying a suffix to return like so:
RETURN$ SThis tells the compiler that you want to treat S as a string here.
Do not mix number types unless you are sure they fit.
Doing A%=CALL @func to call a function but using RETURN B!
may overflow A%, as B! can hold bigger numbers.
The return statement will assign B! to ZZ#,
and the CALL statement will assign ZZ# to A%.
BASIC IDE always uses double precision for the return value if it's a number,
because all 3 number types (double,single,integer) fit into it losslessly.
For strings, it switches to $ automatically.
The IDE recognizes constant strings in a return liks this: RETURN "TEST".
To facilitate returning values, the compiler uses the ZZ# variable.
In general you can use this name for your own purposes too
but you should avoid it as it serves special purposes
and may contain values left over from previous function calls.
In the future you will be able to change "ZZ" on a per-project basis.
The user interface
The IDE is a simple MDI application (a window that contains other windows).
You can access all functions via the main menu bar.
Menus
This chapter explains the top menu bar functions.
Menus that show serial port names are rebuilt every time you interact with the menu bar. This means you don't need to restart the IDE if you forget to attach your USB to serial adapter.
File menu
This contains your standard new/open/save commands.
The IDE can only open one project at a time. If you try to create a new or open an existing project while one is already open, it will spawn a completely new IDE instance instead.
Edit menu
This contains the standard windows text edit commands.
Project menu
- Add function: this adds a new function to your project
- Build mode: This allows you to set whether you want debug or release mode.
- Build: Builds the BASIC program and shows the final source code to you.
- Build and Upload: Like the "Build" menu, but will send the source to your TRS-80
- Clear messages: Clears messages at the bottom of the window after a build
Tools menu
Allows you to set the editor font as well as application settings.
TRS-80 menu
Allows you to transfer files and open a serial text terminal
Window menu
Allows you ro re-arrange and switch to different windows.
Help menu
Will lead to an about window, this help, or the source code. A basic reference can also be viewed, but be aware that this is TRS-80 specific.
IDE Windows
This chapter explains the various windows of the application
Main window
This hosts all other windows. At the top is the menu bar, and to the right is the project overview. The compiler messages are at the bottom, but this is only shown if messages are present.
You can double click function names to open the respective code. A context menu is available to rename and delete functions. You can also rename the project itself this way.
Note: Functions are shown in alphabetical order with the exception of the main function.
Editor window
The editor is where you write your code. You can have multiple editors open at the same time, each one handling an individual function.
Upload window
This is shown when you upload code to the TRS-80. It shows the command you have to type on your model 100 as well as a progress bar that shows how much has been sent.
You can abort the transfer using the "Cancel" button. The button will be labeled "Close" if no operation is currently taking place.
The progress bar is a mere approximation of the transfer state. Some serial ports may cause the bar to be widely inaccurate.
Settings window
The settings window currently only allows you to set the serial port properties. In most cases you don't want to change them.
Special options:
"Auto" is available as a baud rate. If selected, the IDE will use 600 to upload code, 300 to upload documents, and 19200 to download code or documents.
This reflects the approximate maximum speeds the device is capable of. Trying to send data to the model 100 at higher speeds might overflow the buffer.
The slow speed is necessary to compensate for the abysmally slow display routines.
Primitive mode:
Primitive mode can be enabled when you use a serial cable that misses some or all auxiliary signal lines. The IDE uses these signal lines to determine when a file transfer can be started. If your cable lacks these lines you should get a better cable, but in the mean time can enable this option. This causes most of the automated processes getting replaced with manual instructions in dialog boxes.
Terminal window
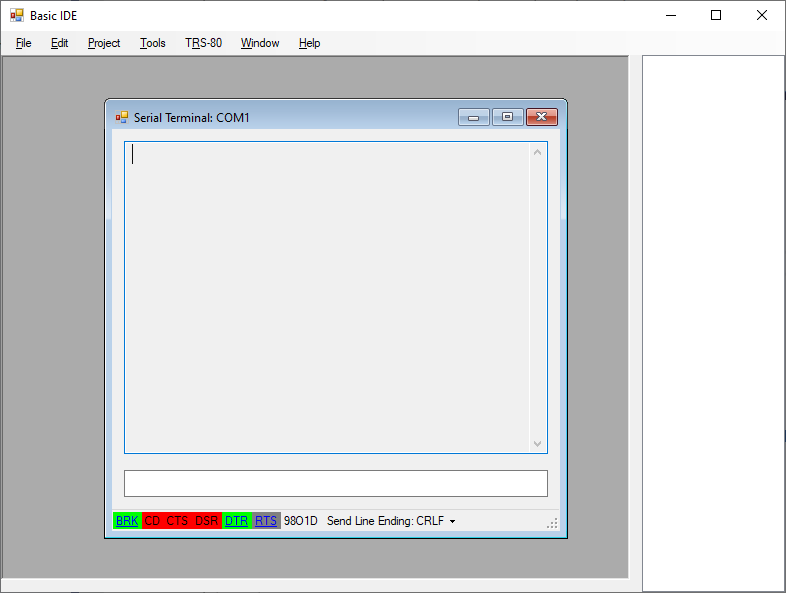
The terminal window is a simple text based terminal. You can also use it as a way to debug serial signals, because it shows the state of all signals using color:
- Green: This line is in good state for data transfer
- Red: This line is bad state for data transfer
- Grey: This line is locked by the system and cannot be read or set
It also shows the mode string you have to use on the model 100, as well as the line break in use for sending lines. You can click on the line break label to change the type of line break between CR, LF, and CRLF.
Explanation of signal lines:
- BRK: This is not a line but a special signal. If red, the TX line is pulled low
- CD: Carrier detect
- CTS: Clear to send
- DSR: Data set ready
- DTR: Data terminal ready
- RTS: Request to send
Lines which are underlined can be toggled with the mouse.
Note: Break state is inverted. If green, the line is usable and not in break state. This is set this way so a good connection has all labels set to green color. Enabling break state may send a single garbage character to the model 100 because a low TX line consists of valid data if parity is disabled or odd.
Trying to send data while in break state will prompt you to disable it.
You cannot send data if the carrier signal is not present. Enabling primitive mode in the settings will make it ignore any signals.
You can open one terminal for every serial port.
Backup/Restore window
This window allows you to backup and restore BASIC programs and documents.
You can press one of the 4 BASIC/document backup/restore buttons to trigger the respective function.
Project file structure
The project file itself is a simple XML file with metadata. The BASIC code itself is stored in a folder with the same name as the project file.
Inside of the folder you find a file for each function. This makes the project source control friendly.
Line endings
The line ending of the files should be CRLF. The model 100 dislikes CR or LF only linebreaks.
Editing outside of the IDE
Editing the project is as simple as modifying files in the project directory. Functions can be added and removed by simply creating and deleting files. Renaming files renames the function.
The only operation not supported is renaming the main function. For this you additionally have to edit the project file itself.
External changes while the IDE is running
The project tree in the IDE will not reflect your changes immediately. Compile the project to rescan and rebuild the project tree.
You need to close and re-open the respective editor window in the IDE if you edit the file from outside while it's open in the IDE.
In general, you want to close the IDE before modifying the project using other tools.
Editing the .t80 project file itself while the IDE is running is not supported
Invalid edits
Make sure your edits are valid. If you create a function with an invalid name you will not be able to call it for example.
Edits in the .t80 file that lead to an invalid XML content prevent you from loading the project.
Main function
Each project starts with a function named "main". This is where BASIC will start to execute code.
You can rename this function in the project view if you want to. The main function is always listed first in the view. All other functions are listed in alphabetical order.
Serial port hardware
To communicate with your TRS 80 you need a serial port. The most widely used way of achieving this by now is to use a serial to USB adapter.
These devices are fine for the occasional file transfer but are less suitable for intensive use. The RS-232 serial port supports a wide voltage range, but USB adapters tend to stay at the lower end of the permitted range.
An additional problem are the buffers. USB adapters and drivers tend to have a fairly big buffer for data in both directions. This will cause code uploads to appear very fast, but then get stuck at 100% for a while. That's because you can very quickly fill up the buffer, but the actual file transfer is still limited to the configured baud rate.
The recommended fix for this is a real serial port card. They're still being made and very cheap.
The linked serial port card supports additional protocols (RS-422 and RS-485) as well as custom baudrates and 9 bit mode.
It plugs into the smallest PCI express slot. Drivers for Windows 10 and later are available.
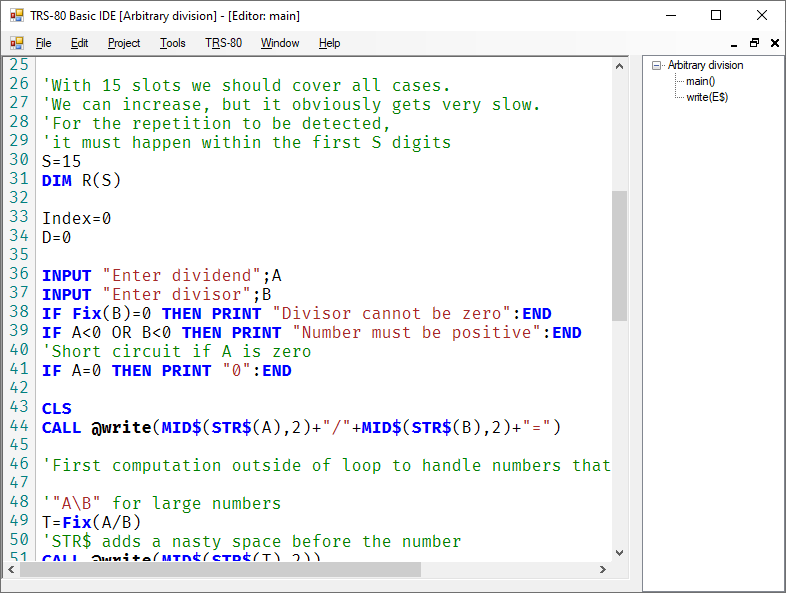
Example project
This small project will divide two integers with arbitrary precision. It will divide until the division either ends, or when it detects repeating decimals. Divide 1 by 17 for a nice example that doesn't runs too long.
- Download
- Extract all files
- Open the .t80 file in Basic IDE
Copyright © 2022 by Kevin Gut 📧 | More services | Generated for 216.73.217.113